do it yourself: Holiday pop-up card
Ring in the holiday season and explore engineering with this fun and simple pop-up card project! Turn two-dimensional paper into a three-dimensional, moving creation using cardstock, scissors and glue. The finished card can be a decoration or a gift for someone you know.
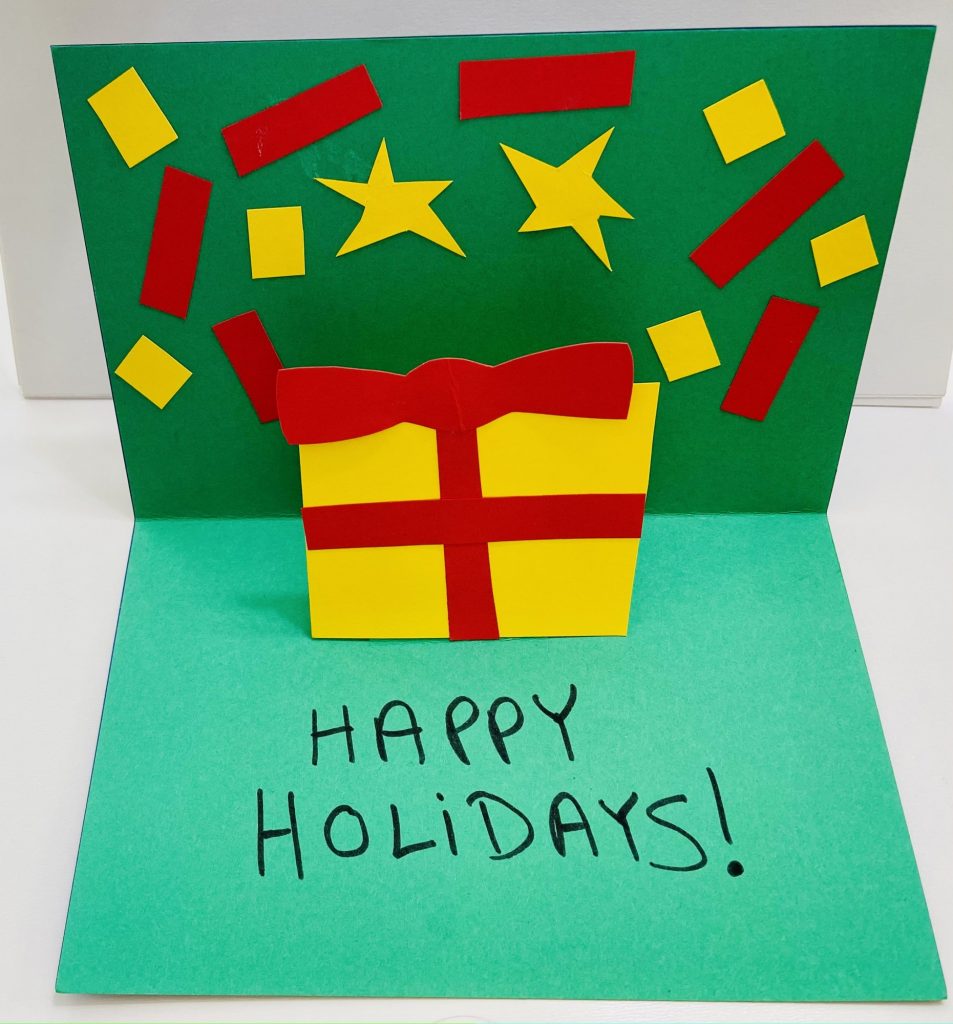
Holiday Pop-Up Card Tutorial
AGE: 4+ (with adult support)
TIME FRAME: 30 min
SUPPLIES:
- 4 pieces of colored cardstock (in different festive colors)
- 1 pair of scissors
- 1 glue stick
- 1 black marker
- 1 Ziploc sandwich bag
- 1 pencil (optional)
Directions
1. Select and ready papers. From the set of four papers, choose two papers to be the inner and outer cards. The remaining papers will be used for the pop-up feature and details.
2. Create inner card. Fold in half the paper that will be the background of the card (inner card) and then create two parallel cuts (lines in the same direction and same distance apart) in the center of the fold (about 1 inch in length). The cuts can be bigger or smaller as long as the two cuts are the same size. After making the cuts, there will be a flap in the middle of the fold that looks and moves a bit like a loose tooth. Follow the next step to turn that into the pop-up feature of the card!
3. Push out the pop-up ledge. Open the inner card and use your index finger to push the fold in towards you. See how it pops! A small ledge (looks like a table) will appear in the middle of the card.
4. Attach inner card to outer card. Fold the outer card in the same way you folded the inner card – making the creases tight! Next, glue the inner card inside the outer card. When doing this, be sure that the pop-up feature (loose tooth) is pushed inside the card, leaving a gap where it had been (now it looks like a missing tooth). Glue down each side of the inner card, one at a time, into the outer card, using lots of glue.
5. Design pop-up piece. Using the other cardstock colors, create a shape that you’d like to have pop out. Measure the pop out shape by placing it against the pop-up feature ledge. If it hangs over the inner card, it will also stick out when the card is closed. Trim down the shape so that it doesn’t stick out. Then, use glue to attach the pop-up shape to the front of the paper ledge.
6. Add more! Use the remaining cardstock scraps, add details to the pop-up shape picture and around the inside of the card. Use the black marker to add details, as well as a greeting on the inside of the card. Feel free to decorate the front or back of the card as well.
7. Share your design. Share your finished design with your family or friends by using it as a decoration or as a gift. Consider sharing with them what surprised you while making your card and telling them about your discoveries and challenges. If you have more or other paper available, try a new design!
Additional Learning Activities (Grades K-5)
Pop-Up Storytelling
Use a pop-up card to tell a story. Think up a short story or retell one you already know using a pop-up card. Create a character or an important scene from the story and illustrate it inside your card. Write the story on the outside or inside of the card or tell the story out loud to an audience while sharing your card.
Pop-Up Challenge
There are many ways to make a pop-up card! Can you design one yourself or explore books about pop-up card making or videos to get more ideas? Play with paper and scissors to try your own methods or test out ones you find. Once you have a new method in mind, use it to create a new card or other work of art.
Observe Your World
Artists are always observing their worlds and using what they see to inspire their works. Why not look around you and your world for interesting shapes and use them in your card designs. Go on a shape hunt and choose shapes to recreate in your card design. Or, select shapes/objects that have personal significance to you.
Select a Story
Reading is a wonderful vehicle for learning and for introducing new ideas. Select pop-up books or books about making pop-ups to inspire you in your card making and read them before and/or after doing the Holiday Pop-Up Card activity.
Recommended Related Reading (Ages 4-10):
- The Color Monster: A Pop-Up Book of Feelings by Anna Llenas
- Easy to Make Pop-Ups by Joan Irvine and illustrated by Barbara Reid
- Pop-Up Volcano by Fleur Daugey and illustrated by Tom Vaillant
CA Arts Standards for Visual Art (Grades K-5)
- Engage in exploration and imaginative play with various arts materials.
- Explore uses of materials and tools to create works of art or design.
- Use observation and investigation in preparation for making a work of art.
- Repurpose found objects to make a new artwork or design.
- Discuss and reflect with peers about choices made in creating artwork.
- Create personally satisfying artwork using a variety of artistic processes and materials.
- Discuss, reflect and add details to enhance an artwork’s emerging meaning.
- Brainstorm individual and collaborative approaches to a creative art or design problem.
- Identify, describe and visually document places and/or objects of personal significance.


