do it yourself: cardboard collagraph
Explore the easy and fun process of collagraph printing. First, create a unique collage on a cardboard printing plate using found materials. Then, make multiple versions or prints of your design in the form of rubbings made with crayons!
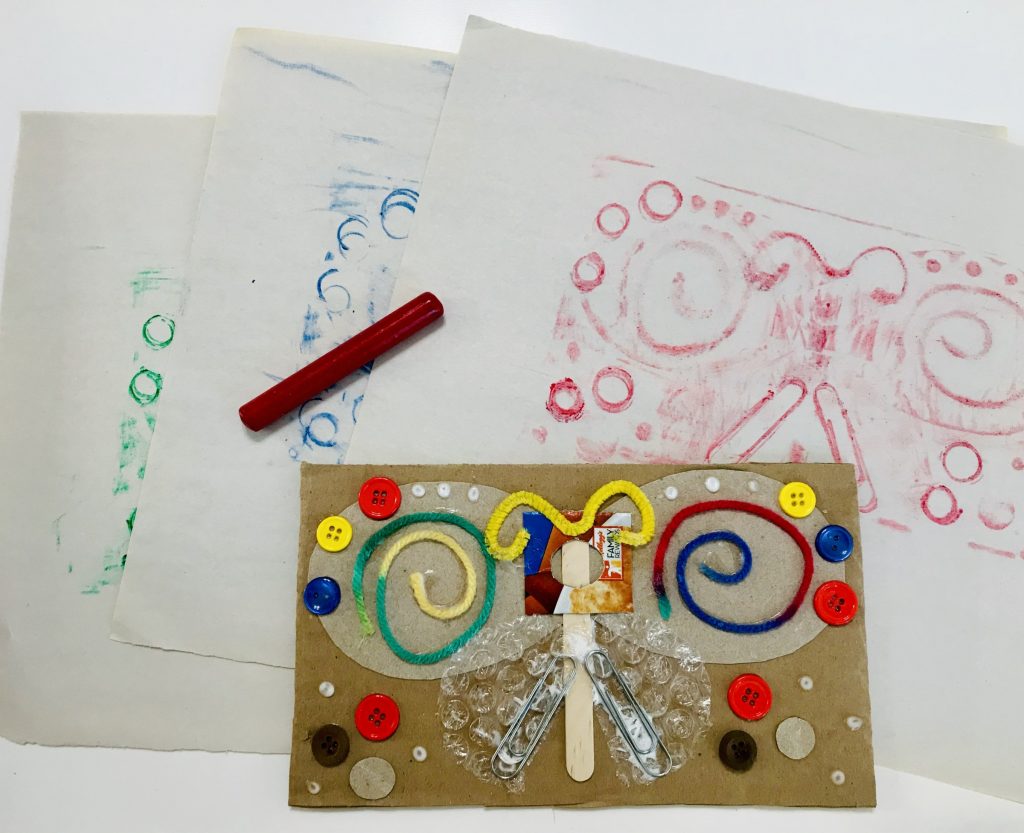
Cardboard Collagraph Tutorial
AGE: 4+ (with adult support)
TIME FRAME: 90 min (includes drying time)
SUPPLIES:
- 1 Piece of Standard Cardboard
- 3-5 Sheets of Lightweight Paper
- 1 Bottle of Elmer’s or Tacky Glue
- Masking Tape
- Scissors
- Pencil (optional)
- 3 – 4 Crayons (paper removed)
- Recycled and Craft Objects
directions
1. Collect your materials. Look for an assortment of found materials to use for your collage. Consider recycled objects such as thin cardboard (cut from cereal boxes), bubble wrap, paper clips, buttons, etc. Also, explore what craft materials you may have around, including popsicle sticks, pipe cleaners, yarn and more. Make sure these found materials are about the same thickness and not sharp. Create your collection and get ready to use those objects to make art!
2. Create your plate. To make your collagraph, you will first need to make a “plate” using a piece of cardboard. This is the background surface onto which you will collage your materials. Cut a rectangle or square shape from your cardboard, being sure to keep it smaller than your printing paper.
3. Collage time! Using your collection of found materials, create a design on top of the cardboard piece. Use scissors and play with cutting out a variety of different textures, shapes and sizes to assemble your design. Cut the largest shapes first and glue them down. Other materials can then be layered on top. Before gluing materials onto your design, however, be sure to give yourself time to play around with your ideas. Tip: Try not to make your collage too tall. If you have too big of a height difference among your materials then you may lose details or tear the paper when creating your rubbings later.
4. Making multiple rubbings. One exciting part of collagraph printing is making multiples of the same design! To create a rubbing (print), place the cardboard plate on a flat surface. Lay a sheet of slightly larger newsprint or lightweight paper over the top. Use one hand or two small pieces of masking tape to hold the paper in place. Then, use the other hand to firmly but slowly rub the side of a crayon over the paper and plate. Be careful not to push too hard as the paper could tear. Make multiple rubbings, using different colored crayons, and see what you learn from trying the process over and over. Keep in mind that some details may not come through or change slightly with each print. Try to embrace the differences between prints and to celebrate each rubbing as a unique work of art!
5. Share Your Design! Share your finished design with your family or friends. What surprised you while making it? Do you have a favorite area or element that came from it? Think about and share your discoveries and challenges.
Additional Learning Activities (Grades K – 5)
Dive in with Details
Using other art materials (such as a pen, pencil or marker), encourage your child to play with individualizing each of their rubbings by adding new details and other materials. They can hand color their rubbing, add new details or designs and fill in certain areas with new color. Consider choosing contrasting or complimentary colors to make the original design stand out.
Paint It Up!
Work with your child to try inking-up your plate using acrylic or tempera paint. You may first want to brush over your plate with a thin layer of glue and allow it to fully dry. Then, use a sponge to dab paint onto the design, making sure to get into the various spaces. Place a sheet of paper on top of the wet plate and rub the paper firmly with your hand. Extend the project further by creating interesting backgrounds on which to print!
Select a Story!
Reading is a wonderful vehicle for learning and for introducing new ideas to learners. Select engaging and age-appropriate books that feature illustrations using collage and read to your child before and/or after the Cardboard Collagraph activity.
Recommended Related Reading (Ages 4 – 10):
- You Matter by Christian Robinson
- Saturday by Oge Mora
- The Mixed-Up Chameleon by Eric Carle
- Radiant Child: The Story of Young Artist Jean-Michel Basquiat by Javaka Steptoe
CA Arts Standards for Visual Art (Grades K – 5)
- Engage in exploration and imaginative play with various arts materials.
- Explore uses of materials and tools to create works of art or design.
- Use observation and investigation in preparation for making a work of art.
- Repurpose found objects to make a new artwork or design.
- Discuss and reflect with peers about choices made in creating artwork.
- Create personally satisfying artwork using a variety of artistic processes and materials.
- Discuss, reflect and add details to enhance an artwork’s emerging meaning.
- Brainstorm individual and collaborative approaches to a creative art or design problem.
- Identify, describe and visually document places and/or objects of personal significance.


